Proper cleaning and installation of the 10,000-watt laser output head can ensure long-term efficient processing!
How to clean and install the 10,000-watt LOE laser output head:
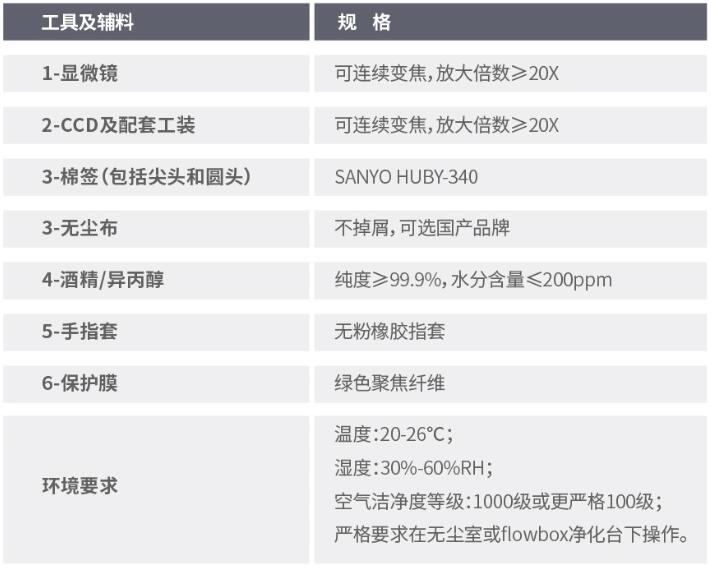
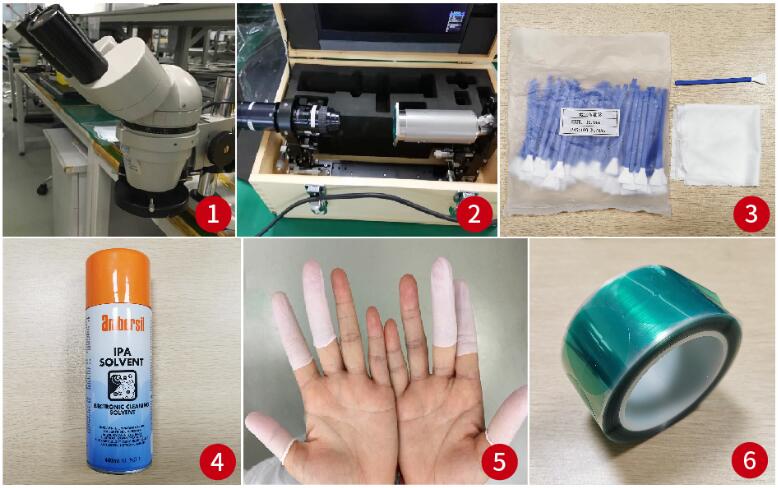
1. Prepare cleaning tools

2. Take out the integrated LOE 10,000-watt output head
Usually LOE products have three states:
1. Individually packaged LOE: Open the box (see Figure 1), take the entire LOE out of the box, and place it in the inspection area;
2. LOE installed on the whole machine: remove the front metal parts of the LOE from the whole machine (see Figure 2) and place it in the inspection area;
3. LOE installed on the cutting head: remove the front metal part of the LOE from the cutting head (see Figure 3), place it in the inspection area, and follow step 3 directly.
Notice:
1. In the process of taking, it is necessary to protect the front-end metal parts and the tail-end optical fiber, and it is not allowed to collide with the ground or other hard objects;
2. After removing the LOE from the cutting head, the assembly surface of the cutting head should be sealed and dustproof as soon as possible, and the rubber ring should not be loosened.
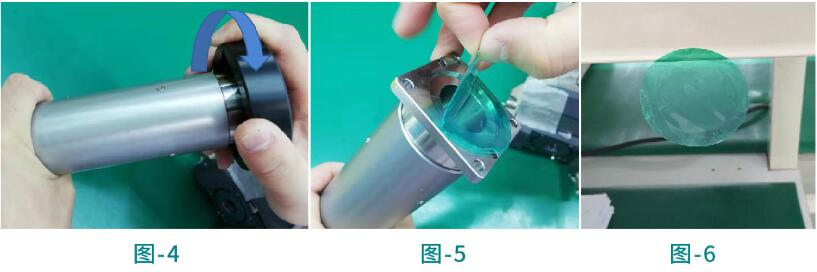
3. Check the protective film of the 10,000-watt output head
Rotate and remove the dust cap (see Figure 4), and visually inspect the outer surface of the green protective film. If any dirt or foreign matter is found, wipe it with a clean cloth dipped in alcohol. Gently tear off the protective film (see Figure 5), and visually inspect the inner surface. If dirt is found, the protective film should be scrapped. If no dirt is found, stick one side of the protective film on a clean table or other area for future use. (see Figure 6).
Note: When pasting the protective film, try to minimize the pasting area so that it can be reused in the future.
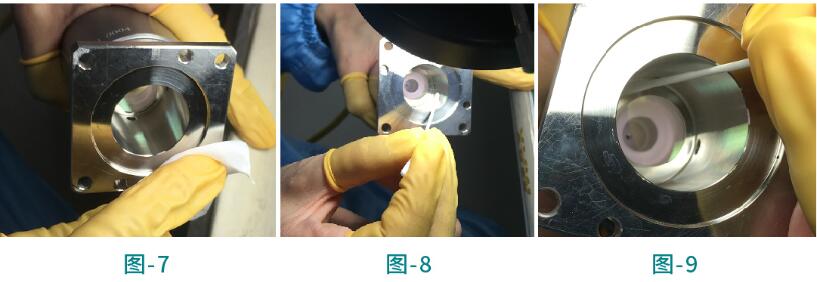
4. Inspect the cleanliness of 10,000-watt LOE metal parts
In order, visually inspect the surface of the metal parts on the edge of the port, the inner wall of the port, and the metal step surface on the edge of the crystal under the light in sequence. If the inner wall of the port and the step surface are dirty, use a round-tip cotton swab or a pointed cotton swab dipped in alcohol to clean it according to the shape and location of the dirt (see Figures 8 and 9). If it is found that individual foreign bodies are small and difficult to remove, they can be cleaned under a microscope or CCD.
Precautions:
1. Finger cots must be worn. During the cleaning process, if finger cots, dust-free cloths and cotton swabs are found to be dirty, they should be replaced in time;
2. Use the cotton swab with moderate force to avoid cotton silk or debris due to friction.
5. Check the cleanliness of 10,000-watt LOE crystal
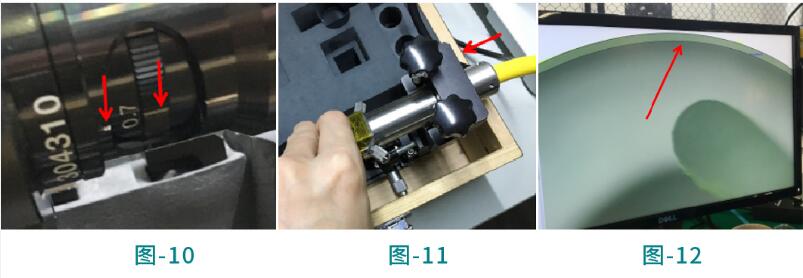
1. Turn on the switch of the monitor and CCD, adjust the scale to "0.7" (see Figure 10), adjust the brightness of the LED light, and then fix the LOE in the tooling and lock it (see Figure 11). Adjust the focal length of the CCD to ensure that the entire crystal end face is clearly visible;
2. Check the cleanliness of the entire crystal end face on the screen. If dust or foreign matter is found, use a round-tip cotton swab dipped in alcohol to clean it. When using the cotton swab, pay attention to wiping in a straight line in one direction (see Figure 12), with gentle force, rotate the cotton swab 180° for each wipe, and continue to wipe with the other side. Wipe to prevent dust particles from contaminating other areas or directly scratching the surface with a cotton swab;
3. After the cleaning is completed, confirm again under the CCD whether the dust or foreign objects have been completely removed, and no residual alcohol marks or other movable foreign objects are allowed.
Note: If there is no CCD equipment on site, you can inspect and clean the crystal end face under a 20X microscope.
6. The 10,000-watt LOE output head and the cutting head are connected and installed
1. Visually inspect the assembly area of the cutting head and the surface of the rubber ring. If any foreign matter is found, use a clean cloth dipped in alcohol to clean it;
2. According to the assembly requirements, put the qualified LOE back on the cutting head and tighten the screws to complete the assembly (see Figure 13, Figure 14, Figure 15).
3. If the cutting head does not need to be assembled, use a clean protective film to seal the LOE port, install and lock the dust cap, and finally put the LOE back in place.